Thursday 7 May 2015

Alternatives for Microsoft Load Balancing

What are the Alternatives for Microsoft Load Balancing: below are few which are famous for their brand  :)

o    F5 Networks

o    Barracuda

o    Citrix NetScaler

o    KEMP

o    Cisco ACE

Differences between App-V 4.6 and App-V 5.0

App-V 4.6


App-V 5.0


Windows XP, Vista, 7 and 8.x desktop OS support

Windows 7 and 8.x desktop OS support

Windows Server 2003, 2008 and 2008 R2 Server OS Support

Windows Server 2008 R2 and 2012 Server OS Support

Dynamic Suite Composition (DSC)

Connection Groups

Primary Virtual Application Directory (PVAD)

PVAD no longer required prior to sequencing

Limited Shell Extension Support

Extended Shell Extension Support

Limited ActiveX Support

Improved ActiveX Support

Shared Read Only Cache

Shared Content Store

.SFT package file format

.APPV package file format

Packages are backwards compatible with earlier versions

No backward compatibility; Converter Tool or Sequence again.

.OSD


.XML Dynamic Deployment/User Configuration

Sfttray.exe for application launch


Application .exe initiated directly

Application reboot simulated by Sequencer


Application reboot physically actioned during Sequencing

RTSPS, RTSP, HTTP, HTTPS and SMB streaming


HTTP, HTTPS and SMB streaming

SFTMIME/SFTTRAY commands on client and SFTSEQUENCER command line for sequencer


PowerShell commands on client, sequencer and server

Q: Drive


No mount drive on sequencer or client

Sftlog.txt and Event Log error reporting


Moved to Applications and Services Event Logs

SFTFS.FSD cache file


File/Folder structure in %PROGRAMDATA%

Default isolation of applications


Default isolation of application apart from Virtual Application Extensions

MMC Management Server Console


Management Server Silverlight web console

ApplicationSourceRoot


PackageSourceRoot


Above are the  Differences between App-V 4.6 and App-V 5.0

Migration from APP-V 4.6 to 5.0 with SP3

Monday 27 April 2015

Hardware Models and hardware integration for SCCM 2012

Below are few Models that I have worked last week for hardware integration for SCCM 2012

Model Name    MTM number
Lenovo T440p - 20AN    
Lenovo T440p - 20Aw
Lenovo X240 - 20AM   
Lenovo L440 - 20AS
Lenovo M83 - 10AH   
HP DC7900 SFF   
Lenovo M58 - 6234AL4   
Lenovo M58 - 6234F48   
Lenovo X230 - 2324   
Lenovo T430 - 2347   
Lenovo T430 - 2344   
Lenovo M82-2742   
Lenovo M82 2929   
Lenovo x230 - 2325   
Lenovo T430 - 2349   
Lenovo W520 (4284-4LG)   
Lenovo X220 4291-4CG   
Lenovo L440 - 20B7, 20AN, 20AM
Lenovo T440 - 20B7
Lenovo T430 - 2349
Lenovo X230 - 2324 and 2325

Tuesday 21 April 2015

How can I Install PnP drivers without Actually installing SCCM Tasksequence

How can I Install PnP drivers without Actually installing

How can I setup SCCM to install Drivers automatically / PnP

This is completely out of box from SCCM, as this is nowhere talked about in the documents for SCCM, We actually follow windows default method of *.inf files to install Drivers by using PnpUtil.exe file.


For example if we have Lenovo T440p Model and we wanted to integrate it as a first step we need to copy the Driver to some folder in target system and then while rebooting we can use Pnputil.exe command to install best matching PnP Device Drive drivers from source.

Create T440P model Drivers Source PnP source

And as a next step I have created a basic task sequence and added a step called Copy Drivers to Locally to C:\Drivers Folders

 Copy all the drivers to a local driver

clip_image002

xcopy.exe ".\*.*" "c:\Drivers\" /D /E /C /I /Q /H /R /Y /S

Final step would be call a batch file with help of for command, after SCCM client installing step. See below

clip_image004


Below is the impdrv.cmd file

forfiles /p %1 /s /m *.inf /c "cmd /c pnputil -a @Path"

clip_image006


Ofcourse there are multiple ways, and this is one of the option.

Key benefits of using Nomad

Key benefits

Nomad solves problems in key areas of distributing large amounts of data across a distributed network. In particular Nomad provides the following benefits:

·         Significantly reduces the bandwidth required for delivering software.

·         Small offices or sites connected via poor network links can receive software updates more reliably.

·         Reduces the need for large numbers of ConfigMgr servers.

·         Faster ConfigMgr implementations because fewer servers are required.

·         Distribute software to home, mobile and remote office users

·         Low cost – easy to deploy

·         No new infrastructure or skills required

·         Reduces software distribution costs

What is new in Nomad 2012 v5.0.100

Welcome to the Nomad 2012 Version 5.0.100 on-line documentation. Here you can learn about how Nomad 2012 works, the new features it supports and how the Nomad 2012 components fit together to provide enterprise-wide, efficient and secure content download.

Installation Engineers can find out about the prerequisites for installing Nomad 2012 and check the installation steps.

Systems administrators can find out how to: configure Nomad 2012 for use with Configuration Manager 2012, configure Nomad 2012 for OS deployments, monitor Nomad 2012 downloads, manage the Nomad 2012 cache and find information on the Nomad 2012 command-line switches, return codes, status message events and registry entries .

Enterprises interested in providing bare metal OS deployment in branch scenarios can find out how to install and configure PXE Everywhere v2.1.

What is new in Nomad 2012 v5.0.100

This maintenance release includes the following new capabilities:

·         Peer Backup Assistant configuration during Nomad installation - The Peer Backup Assistant can now be configured using dedicated Nomad installer properties.

·         ConfigMgr 2012 SP1 support

·         Windows 8 and Windows Server 2012 support

New in Nomad 5.0

This new release of Nomad contains two new features related to maximizing the efficiency of distribution of downloads to machines on a branch subnet and enabling single site downloads for multiple subnets over a WAN.

·         Nomad FanOut - this feature enables more Nomad Peers to be updated with the download from the Nomad Master by allowing the machines directly connected to the Nomad Master to themselves share out the download.

·         Single Site Download - this feature ensures that downloads are performed only once per branch site, not per branch subnet - thereby maximizing the efficient distribution of downloads without using the WAN more than once.


Welcome to Nomad the key software from 1E that increases the efficiency of software and patch distribution and saves you money in the process. It maximizes WAN availability during download by providing features such as: Central Multicast, download once to branch, and download resumption with built-in consistency checking.

Click here to find out what is new in Nomad .

Now in its fifth generation Nomad integrates with Microsoft System Center Configuration Manager (ConfigMgr), to provide increased resilience and bandwidth throttling and maximize use of advanced features like Remote Differential Compression to make optimal use of any type of network connection with minimal impact on network users. Using Nomad with ConfigMgr you can enable software update capabilities for machines which would have previously been unmanaged.

Nomad reduces the load on the central Distribution Points and eliminates the necessity for local Distribution Points. This allows the ConfigMgr infrastructure to be simplified while still retaining coverage of the entire network and reducing maintenance costs.

Nomad consists of two main components:

·         Nomad, the content transfer utility that helps deliver large content efficiently, safely and securely.

·         PXE Everywhere v2.1, a tool that helps deliver OS updates to bare metal computers

Step by step Installation of 1E Active Efficiency

Installation of 1E Active Efficiency 1.3


Summary:

This document was intended to outline the installation procedure for VF Corporation for the above named 1E Product.

The assumption is that the installation will occur on the SCCM 2012 CAS server.

The MSI can be found in: D:\Installers\1E\1. Active_Efficiency_v1.3.0.118

The PowerShell script to load AD Site and Subnets into AE is run as a scheduled Task from the CAS: D:\1E_AE_1.3\Active_Efficiency_v1.3.0.118\PostADSitesandSubnets


Locate the Installation

Locate the ActiveEfficiency.msi in the above folder and double-click on the ActiveEfficiency.MSI file to begin the installation.


image

Welcome Screen


On the Welcome Screen click the next button:

image

License Agreement

Place a click on the radio button next to “I accept the terms in the license agreement” On the License Agreement Screen.

Click on the “Next” button

image


PreRequisite Checks

Ensure all checks passed and Click the “Next” button on the Prerequitsite Checks screen


image

Register with 1E Active Efficiency

Uncheck the radio button next to “Yes I want to register with 1E Active Efficiency and select the “Next” button to continue.

image

Change the Installation Folder

Change the “folder name” to “D:\Program Files (x86)\1E\ActiveEfficiency” and click on the “ok” button.


image

Click on the “Next” button to continue installation.

Database Server

Optionally click the “Drop any existing database” if you intend to start from scratch and reload any sites/subnets into the ActiveEfficiency database using the PostsitesandSubnets.ps1 PowerShell script.

During a new installation. The above option would not be needed and just click the “Next” button.
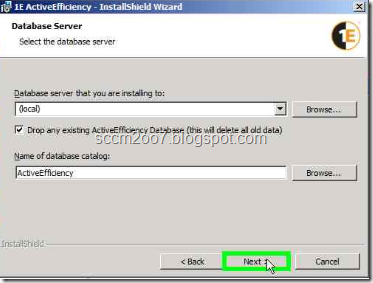


image


ActiveEfficiency Website Settings

Click the “Next” button on the Custom IIS Settings screen
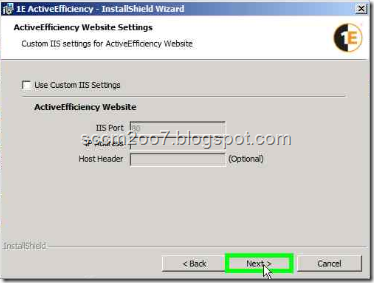
image

Click on the “Install” button to complete the installation
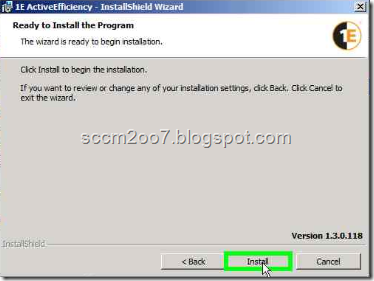
image


Click the “Finish” button to exit the installation

Optionally: tick the box on the “Show the Windows Installer log” to review the installation log file.
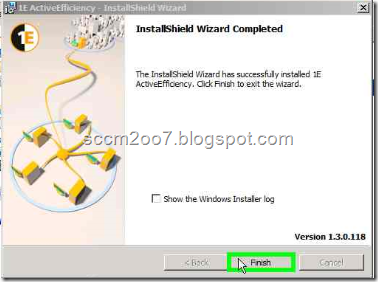
image

Active Efficiency Scripts for SSD

In order to utilize the Single Site Download feature of NomadBranch 2012, the modified example script to post AD Sites and Subnets will be used to post AD Sites and subnets to the Active Efficiency web service. Located at: http://localhost/ActiveEfficiency on the CAS server.

The active script is stored in: D:\1E_AE_1.3\Active_Efficiency_v1.3.0.118\PostADSitesandSubnets

 The PowerShell script to load AD Site and Subnets into AE is run as a scheduled Task from the CAS the details are as follows:

Scheduled time: 9:00 PM

Frequency: every Friday